Using Gambit with the Prover
The mutation verifier checks that variants of the original Solidity program do not pass verification against a given specification. You can either use random mutations generated by Gambit or manually crafted with a specific error. If a mutated program passes the specification, it may indicate that the specification is vacuous or not rigorous enough.
Installation
To use the mutation verifier, first install the Certora Prover and its dependencies. To install it, run
pip install certora-cli
If you already have certora-cli installed and
the certoraMutate command is not available,
you may need to update to a newer version by running
pip install --upgrade certora-cli
Note
If you are on Linux, you will need pip version 20.3 or above.
Running the Mutation Verifier
You need to extend your Prover configuration file by adding a mutation object.
The mutation verification script is called certoraMutate.
Run it from the command line just like certoraRun:
certoraMutate path/to/prover.conf
If you do, the script will generate code mutants, then submit a verification job per mutant to Certora’s server.
Submitting the verification jobs of the mutants may take several minutes. When it finishes successfully, you should see the following lines printed:
******************** PROVER END ********************

You will receive an email notification when this mutation test is completed. It may take several hours.
You can follow the test's progress at https://prover.certora.com/mutations
The time required to verify all mutants depends on various factors, such as the number of mutants, the complexity of the contracts, and the complexity of the specifications. In some instances, the entire testing process may take several hours.
You can follow the test’s progress in the mutations dashboard. The results will be available in the dashboard when they are ready.
Once the test is completed, you should receive an email that looks like this:
Mutation Configuration
The mutation tester script requires a Prover JSON .conf configuration file that includes a mutations key.
Within this key, an object is defined to specify the behavior of mutation testing.
Notably, all other settings, including those influencing compilation or verification,
remain consistent with those defined outside the mutations object.
For example, see the file default.conf from the CertoraInit repository:
{
  "files": [
    "contracts/ERC20.sol"
  ],
  "verify": "ERC20:certora/spec/ERC20.spec",
  "msg": "ERC20Rules",
  "mutations": {
    "gambit": [
        {
            "filename" : "contracts/ERC20.sol",
            "num_mutants": 5
        }
    ],
    "msg": "basic mutation configuration"
  }
}
Mutation Sources
Mutations can either be randomly generated via Gambit, or manually generated by you.
Randomly generated mutations via Gambit
To generate random mutations via Gambit,
add a gambit key inside the mutations object.
This key should include a list of Gambit mutation objects.
All file paths are relative to the current working directory.
For example, see the gambit value from the file advanced_mutation.conf
of the CertoraInit repository:
"gambit": [
  {
    "filename": "contracts/ERC20.sol",
    "num_mutants": 2,
    "mutations": [
      "require-mutation"
    ]
  },
  {
    "filename": "contracts/ERC20.sol",
    "num_mutants": 1,
    "mutations": [
      "assignment-mutation"
    ]
  }
],
Manual mutations
You have the option to include manually generated mutated files, not produced by Gambit, in your mutation test. We refer to these as ‘manual mutations.’ They can be used for regression tests, or to check mutations that Gambit does not currently support.
Note
It is recommended to limit each manually mutated file to a single mutation for more accurate coverage analysis and better traceability.
To add manual mutations, under mutations create a key manual_mutants containing a list
of manual mutation objects.
Each manual mutation object must contain two keys:
file_to_mutate: A file path relative to the current working directory of the file we wish to replace with the mutationsmutants_location: A relative path to a directory from the current working directory. This directory contains files and patches that will be tested in place of the mutated file. All files in the directory will undergo testing. Patches must end with.patchand must comply with thediffshell command. Patches can be created by calling`diff -u original_file mutated_file > mutant1.patch`
where
original_fileis the file to mutate andmutated_fileis the file with the mutation.
The patch will be applied to the original file before running the Prover on the mutant.
For example, see the manual_mutants value from the file advanced_mutation.conf
of the CertoraInit repository:
"manual_mutants": [
  {
    "file_to_mutate": "contracts/ERC20.sol",
    "mutants_location": "mutations"
  }
]
If you don’t have a gambit object in the conf file,
certoraMutate will run only on the manual mutants,
and no other mutants will be generated.
Note
All manual mutations must be named uniquely.
For example, if you want to generate manual mutations for C.sol and D.sol,
name them C.m1.sol, C.m2.sol, D.m3.sol, D.m4.sol, ... etc.
Original Verification Run
A mutation test requires a verification job that was completed successfully without halting as a basis for comparison, called the original run. All mutant checks will be run with the same verification configuration as the original run, and their results will be compared to the original run. Rules that are not verified or did not pass basic sanity checks on the original run will be ignored.
Generating the original run
Usually, the original run is sent for verification with the mutants. An unaltered file without mutations is sent for verification before all mutant verification runs. The mutation test will be aborted if the original run fails to compile.
Original verification link
You can also provide a link to a run that was already executed. The mutants will run with the same specification and configuration as that run. The files relevant for that run will be downloaded to your local machine.
You can provide the original run job’s link via --orig_run, for example:
--orig_run https://prover.certora.com/output/53342/9487899b2afc4709899889fab6c2c673/?anonymousKey=5c365717c9c1076f0c1acb050c7eb5867f07a236
Note
The run must have the job status Executed on the Prover dashboard.
The files will be downloaded to either a default directory or to one specified with --orig_run_dir.
The Mutations Dashboard
You can track your mutation tests at the mutations dashboard. A test that just started would look like this:

The Mutation ID is a unique identifier for the test.
The Message column includes the description given either in the command line via the
--msgflag or the conf file’s"msg"key. It aids in identifying and documenting mutation tests. By default, it will show None.The Status column of a test includes two different parts - the status of the test (see below) and a progress counter. The progress counter shows how many of the sent mutant verification jobs have already been executed.
Mutation test statuses
A mutation test can have one of five different statuses:
Running indicates that the verification jobs of the mutants are still being computed.
Calculating indicates that all the verification jobs have finished, and the results are now being gathered and processed into a verification report.

Executed indicates that all mutant verification jobs were executed correctly and are available in the report, which can be accessed by clicking on the
Mutation ID.

Halted indicates that the mutation test reached a global time limit and was stopped. The partial verification results that were collected before the time limit are available in the verification report. This usually happens when too many mutants are used in a single test.

Problem indicates the test had errors. A report is usually not generated.

Mutation Test Report
The mutation verification results are summarized in a user-friendly visual report.
Here is an example summary for the advanced mutation of an ERC20 example. The green outer circles represent the rules, and the gray dots represent the mutants.
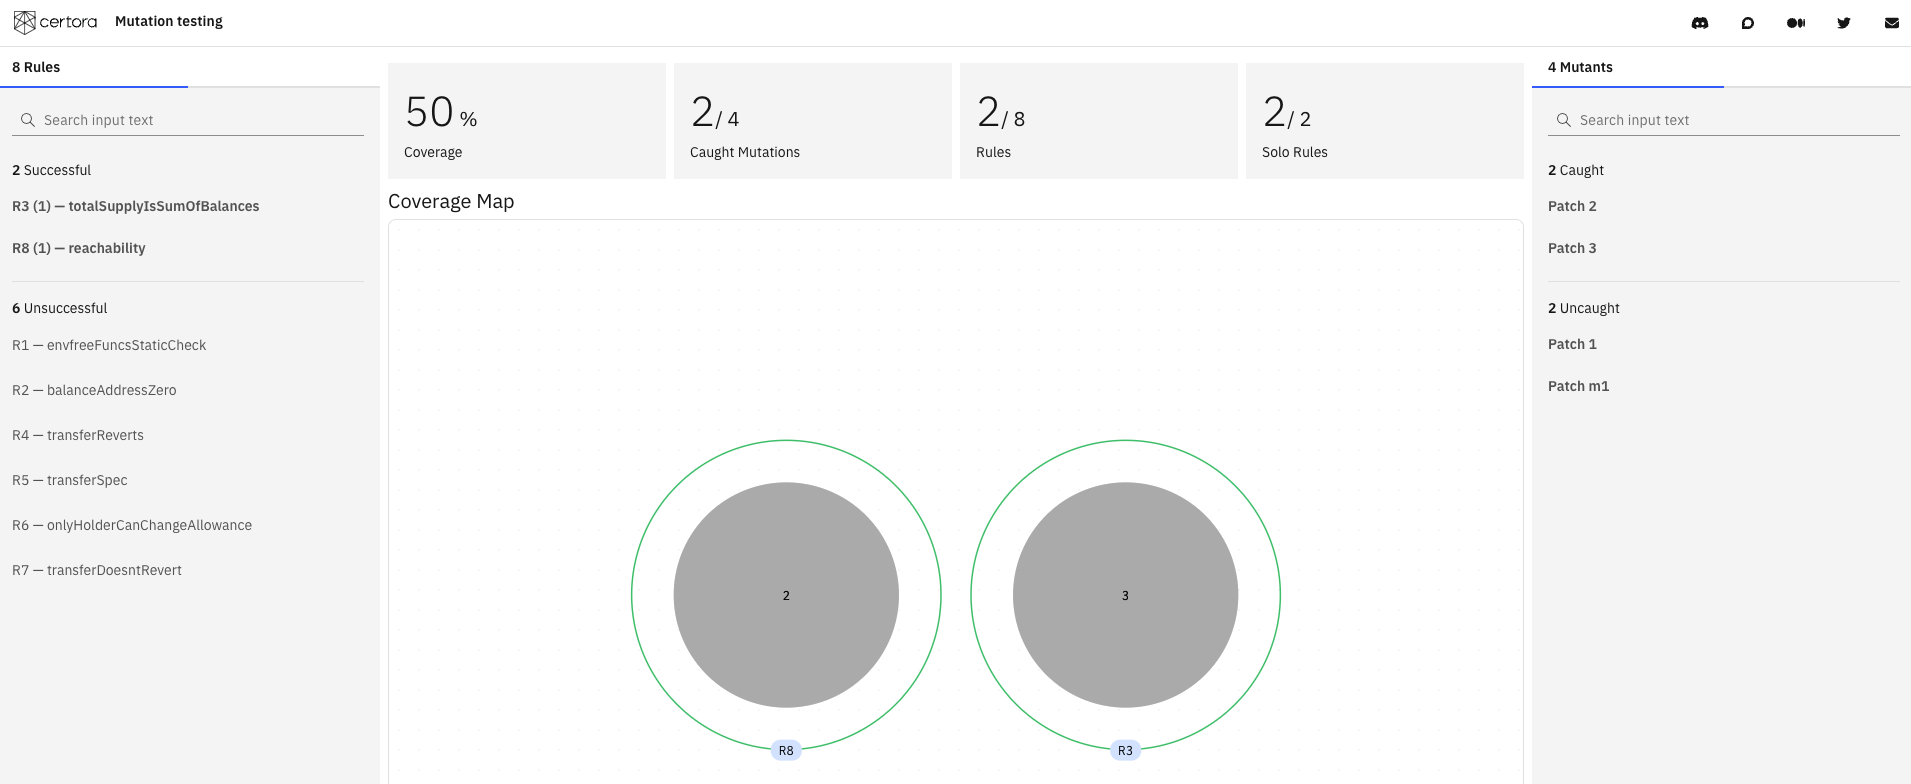
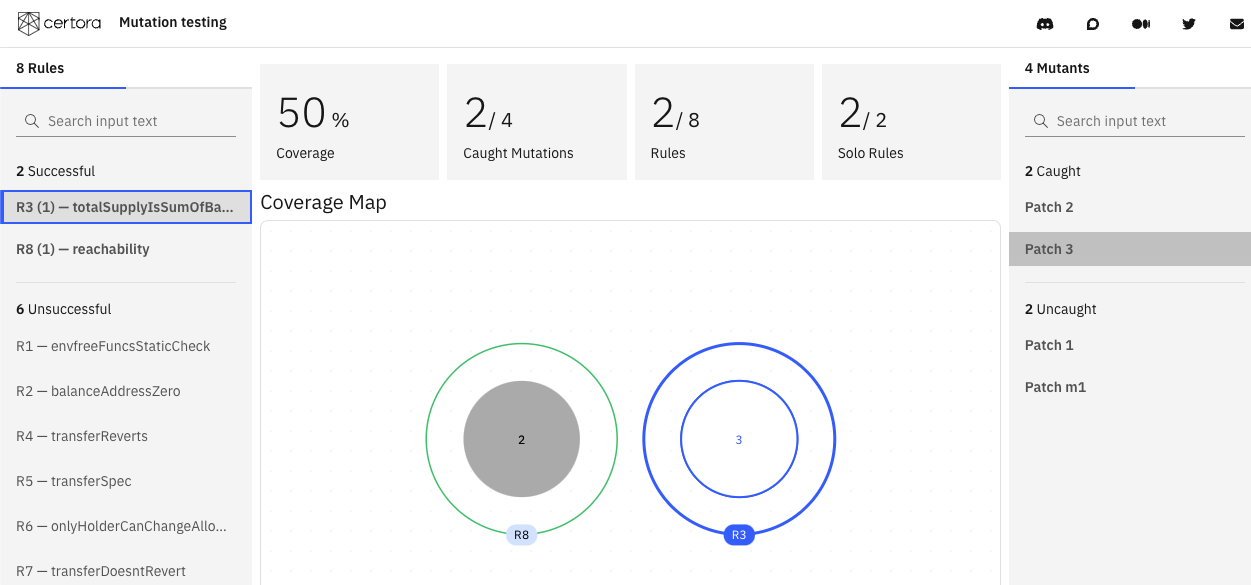
Selecting a rule shows which mutants it detected, and selecting a mutant shows which rules caught it.
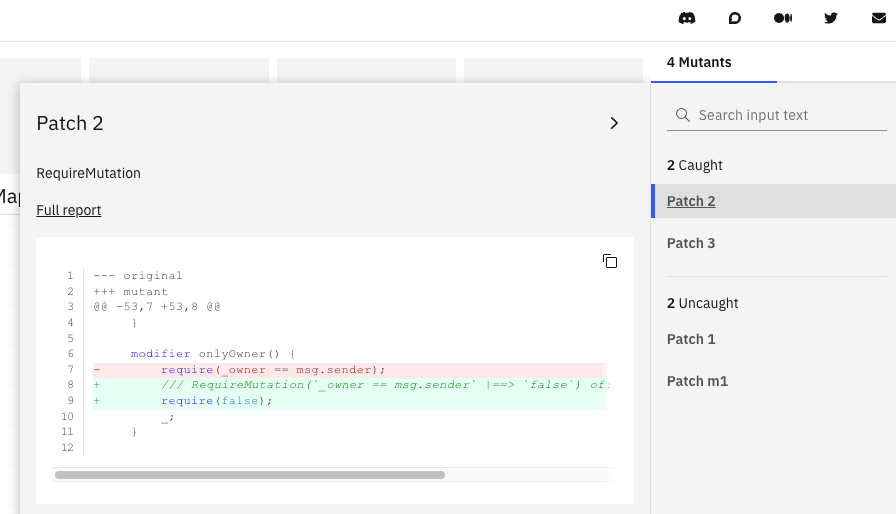
Clicking on a mutant’s patch shows the difference between it and the original program.
Metrics
At the top bar of the report there are different coverage metrics.

The Coverage metric is the ratio of the caught mutants to all mutants tested, also shown under Caught Mutations.
The Rules metric shows the ratio of the rules that caught at least one mutation out of all the rules in the tested specification.
The Solo Rules metric shows the ratio between the rules that caught a unique mutation and all rules that caught at least one mutation.
CLI Options
certoraMutate supports the following options; for a comprehensive list, run certoraMutate --help:
Option |
Description |
|---|---|
|
Specify the link to a previous verification job |
|
Specify the folder where the files will be downloaded from the original verification job |
|
Add a message to identify the |
|
Stop processing after generating mutations |
|
Specify a log file to capture mutant collection failures |
|
Show additional logging information during execution |
Troubleshooting
At the moment, there are a few ways in which certoraMutate can fail.
Here are some suggestions on how to troubleshoot when that happens.
We are actively working on mitigating them.
There are currently no official Gambit binaries for Linux ARM or Windows. That means that Gambit will not be installed with
pip install certora-cli, and must be built from source.Sometimes, the problem stems from Gambit’s mutant generation. Try running with
--gambit_onlyand look at the generated mutations.Try running the Prover on your mutants individually using
certoraRun. Usually the mutant setup will be in.certora_internal/applied_mutants_dirand can be retried by running the Prover’s.conffile withcertoraRun. Manual mutants that don’t show up in the report may had a Solidity compilation error. It is also possible that you are encountering a bug with the underlying version of the Prover.Check if your packages paths have a trailing
/. The packages paths, both sources and targets, should never end with a/.