CLI Options
The certoraRun utility invokes the Solidity compiler and afterwards sends the job to Certora’s servers.
The most commonly used command is:
certoraRun contractFile:contractName --verify contractName:specFile
If contractFile is named contractName.sol, the run command can be simplified to
certoraRun contractFile --verify contractName:specFile
A short summary of these options can be seen by invoking certoraRun --help
For larger projects, the command line for running the Certora Prover can become large
and cumbersome. It is therefore recommended to use configuration files instead.
These are JSON5 files (with .conf extension) that hold the parameters and options for the Prover.
See Configuration (Conf) Files for more information.
Most frequently used options
verify
What does it do?
It runs formal verification of properties specified in a .spec file on a given contract. Each contract must have been declared in the input files or have the same name as the source code file it is in.
When to use it? When you wish to prove properties on the source code. This is by far the most common mode of the tool.
Example
To formally verify a Solidity file Bank.sol, with a contract named Bank inside it, and a specification file called Bank.spec:
Command line
certoraRun Bank.sol --verify Bank:Bank.spec
Configuration file
"verify": "Bank:Bank.spec"
msg
What does it do? Adds a message description to your run, similar to a commit message. This message will appear in the title of the completion email sent to you.
When to use it? Adding a message makes it easier to track several runs on the Prover Dashboard. It is very useful if you are running many verifications simultaneously. It is also helpful to keep track of a single file verification status over time, so we recommend always providing an informative message.
Example
To add the message Removed an assertion to describe the verification job:
Command line
certoraRun Bank.sol --verify Bank:Bank.spec --msg 'Removed an assertion'
Note
You need to wrap your message in quotes in the command line if it contains spaces.
Configuration file
"msg": "Removed an assertion"
rule
Option values A list of rule name patterns.
What does it do? Formally verifies one or more rules or invariants instead of the whole specification file.
When to use it? This option saves a lot of run time. Use it whenever you care about only a specific subset of a specification’s properties. The most common case is when you add a new rule to an existing specification. The other is when code changes cause a specific rule to fail; in the process of fixing the code, updating the rule, and understanding counterexamples, you likely want to verify only that specific rule.
Example
If Bank.spec includes the following properties:
invariant address_zero_cannot_become_an_account()
rule withdraw_succeeds()
rule withdraw_fails()
To verify only withdraw_succeeds:
Command line
certoraRun Bank.sol --verify Bank:Bank.spec --rule withdraw_succeeds
Configuration file
"rule": ["withdraw_succeeds", "withdraw_fails"]
To verify both withdraw_succeeds and withdraw_fails:
Command line
certoraRun Bank.sol --verify Bank:Bank.spec --rule withdraw_succeeds withdraw_fails
Configuration file
"rule": ["withdraw_succeeds", "withdraw_fails"]
To verify both withdraw_succeeds and withdraw_fails:
Command line
certoraRun Bank.sol --verify Bank:Bank.spec --rule withdraw*
Configuration file
"rule": ["withdraw_*"]
exclude_rule
What does it do? This flag is the opposite of rule - it allows you to specify a list of rule name patterns that should not be run.
When to use it? Use this flag when certain rules or invariants take too long to run or require a different configuration than the current verification run.
Example
If Bank.spec includes the following properties:
invariant address_zero_cannot_become_an_account()
rule withdraw_succeeds()
rule withdraw_fails()
To skip checking withdraw_succeeds and withdraw_fails:
Command line
certoraRun Bank.sol --verify Bank:Bank.spec --exclude_rule "withdraw*"
Configuration file
"exclude_rule": ["withdraw_*"]
split_rules
What does it do?
Typically, all rules and invariants (after being filtered by rule and exclude_rule) are evaluated in a single Prover job.
With split_rules the user can run specific rules or invariants on separate dedicated Prover jobs.
A new job will be created and executed for each rule or invariant that matches a
rule name pattern in split_rules an additional job will be created for the rest of the rules and invariants.
After launching the generated jobs, the original job will return with a link to the dashboard,
listing the status of the generated jobs.
When to use it? This option is useful when some rules or invariants take a much longer time than the rest. Splitting the difficult rules or invariants to their own dedicated Prover jobs will give them more resources that will potentially reduce their chance to timeout and will decrease the time to get the final job result for the less computationally intensive rules.
Note
When used together with the rule option, the logic is to collect all rules and invariants that match rule name patterns of rule and then subtract from them all rules that match any exclude_rule patterns.
Example
If Bank.spec includes the following properties:
invariant address_zero_cannot_become_an_account()
rule withdraw_succeeds()
rule withdraw_fails()
To run the invariant address_zero_cannot_become_an_account on a separate Prover job to the rest of the rules (withdraw_succeeds and withdraw_fails):
Command line
certoraRun Bank.sol --verify Bank:Bank.spec --split_rules address_zero_cannot_become_an_account
Configuration file
"split_rules": ["address_zero_cannot_become_an_account"]
method
What does it do?
Only uses functions with the given method signature when instantiating
parametric rules and invariants. The method signature is the ABI
representation of the method, optionally prepended by a contract name or
wildcard (_). If no contract is specified the primary contract is assumed, and
if the wildcard is used then all methods with this signature across all
contracts in the scene will be used.
You may provide multiple method signatures, in which case the Prover will run on each of the listed methods.
One can also provide only the method name (without any arguments). If there are several overloads for this function name all of them will be selected.
When to use it? This option is useful when focusing on a specific counterexample; running on a specific contract method saves time.
Example
Suppose we are verifying an ERC20 contract, and we have the following parametric rule:
rule r {
    method f; env e; calldataarg args;
    address owner; address spender;

    mathint allowance_before = allowance(owner, spender);
    f(e,args);
    mathint allowance_after  = allowance(owner, spender);

    assert allowance_after > allowance_before => e.msg.sender == owner;
}
If we discover a counterexample in the method deposit(uint) of contract C,
and wish to change the contract or the spec to rerun, we can just rerun on
the C.deposit method:
Command line
certoraRun Bank.sol --verify Bank:Bank.spec --method 'C.deposit(uint)'
or (using only the method name):
certoraRun Bank.sol --verify Bank:Bank.spec --method 'C.deposit'
Configuration file
"method": ["C.deposit(uint)"]
To check the transfer method of all contracts in the scene,
but only the deposit method of the primary contract:
Command line
certoraRun Bank.sol --verify Bank:Bank.spec --method 'deposit(uint)' --method '_.transfer(address,uint256)'
Configuration file
"method": ["deposit(uint)", "_.transfer(address,uint256)"]
Note
Many shells will interpret the ( and ) characters specially, so
the method signature argument will usually need to be quoted in the command line as in the above examples.
exclude_method
What does it do? This option is the opposite of method and will exclude from parametric rules and invariants any method mentioned in this list. The methods and their contracts are interpreted in the same way as they are in the method option.
When to use it? If there are specific methods for which a rule/invariant takes too long to run or require a different configuration.
Note
If a method is listed by both method and exclude_method, exclusion takes precedence.
Example
To include all deposit(uint) methods in the scene except the
deposit(uint) function of contract C:
Command line
certoraRun Bank.sol --verify Bank:Bank.spec --method '_.deposit(uint)' --exclude_method 'C.deposit(uint)'
Configuration file
"exclude_method": ["C.deposit(uint)", "_.transfer(address,uint256)"]
parametric_contracts
Added in version 5.0: Prior to version 5, method variables and invariants were only instantiated with methods of Special variables and fields.
What does it do? Only uses methods on the specified contract when instantiating parametric rules or invariants. The contract name must be one of the contracts included in the scene.
When to use it? As with the rule and method options, this option is used to avoid rerunning the entire verification
Example
To debug a counterexample in a method of the Underlying contract defined in the file
Example.sol when working on a multicontract verification:
Command line
certoraRun Main:Example.sol Underlying:Example.sol --verify Main:Example.spec \
    --parametric_contracts Underlying
Configuration file
"parametric_contracts": ["Underlying"]
wait_for_results
Option values
ALL|NONE
What does it do? Wait for verification results after sending the verification request. By default, the program exits after the request. The return code will not be zero if the verification finds a violation.
In CI, the default behavior is different: the Prover waits for verification results,
and the return code will not be zero if a violation is found.
You can force the Prover not to wait for verification results by giving the parameter NONE.
In that case, the return code will be zero if the jobs were sent successfully.
When to use it? Use it to receive verification results in the terminal or a wrapping script.
Example
To wait for full verification results:
Command line
certoraRun Example.sol --verify Example:Example.spec --wait_for_results
Configuration file
"wait_for_results": "ALL"
Options affecting the type of verification run
coverage_info
Option values
none|basic|advanced
What does it do?
This option enables .sol and .spec coverage analysis and visualization.
The coverage_info option may be followed by one of none, basic, or advanced.
If no value was given, then basic will be used by default.
See Coverage Info for more information about the analysis.
When to use it? We suggest using this option when you have finished (a subset of) your rules and the Prover verified them. The analysis tells you which parts of the Solidity input are covered by the rules, and also which parts of the rules are actually needed to prove the rules.
Example
To run a deep analysis of the coverage of your verification:
Command line
certoraRun Bank.sol --verify Bank:Bank.spec --coverage_info advanced
Configuration file
"coverage_info": "advanced"
foundry
What does it do?
Collects all test files in the project (files ending with .t.sol),
and runs the Foundry Integration (Alpha) on them (specifically,
the verifyFoundryFuzzTestsNoRevert builtin rule).
As with the project_sanity option,
the search is over files in the current git repository if such exists,
otherwise over all files in the tree under the current working directory.
Note
This option implicitly enables the auto_dispatcher option.
When to use it? When we want to run all Foundry fuzz tests in the project with the Prover.
Example
To run Foundry with fuzz tests with the Prover:
Command line
certoraRun --foundry
Configuration file
"foundry": true
independent_satisfy
What does it do? The independent satisfy mode checks each satisfy statement independently from all other satisfy statements that occurs in a rule. Normally, each satisfy statement will be turned into a sub-rule (similarly to the multi_assert_check mode), but previously encountered satisfy statements will be still considered when creating a satisfying assignment.
As an illustrative example of the default mode,
consider the following rule R that has two satisfy statements:
rule R {
  bool b;
  satisfy b, "R1";
  satisfy !b, "R2";
}
The statements for R1 and R2 will actually create two sub-rules equivalent to:
rule R1_default {
  bool b;
  satisfy b, "R1";
}

rule R2_default {
  bool b;
  // Previous satisfy statements are required in default mode.
  require b; // R1
  // Due to requiring `b`, this satisfy statement is equivalent to 'satisfy b && !b, "R2";'
  satisfy !b, "R2";
}
Without turning independent_satisfy mode on, R2 would have failed,
as it would try to satisfy b && !b, an unsatisfiable contradiction.
Turning on the independent_satisfy mode will ignore all currently unchecked satisfy statements for each sub-rule.
It would also generate and check two sub-rules,
but with a slight difference:
R1 where b is satisfied (by b=true) while satisfy !b is removed,
and R2 where satisfy b is removed,
and !b is satisfied (by b=false).
The two independent_satisfy generated sub-rules will be equivalent to:
rule R1_independent {
  bool b;
  satisfy b, "R1";
}

rule R2_independent {
  bool b;
  // require b;
  satisfy !b, "R2";
}
When to use it? When you have a rule with multiple satisfy statements, and you would like to demonstrate each statement separately.
Example
To check each satisfy statement independently:
Command line
certoraRun Bank.sol --verify Bank:Bank.spec --independent_satisfy
Configuration file
"independent_satisfy": true
multi_assert_check
What does it do? This mode checks each assertion statement that occurs in a rule, separately. The check is done by decomposing each rule into multiple sub-rules, each of which checks one assertion, while it assumes all preceding assertions. In addition, all assertions that originate from the Solidity code (as opposed to those from the specification), are checked together by a designated, single sub-rule.
As an illustrative example, consider the following rule R that has two assertions:
...
assert a1
...
assert a2
...
The multi_assert_check mode would generate and check two sub-rules: R1 where a1 is proved while a2 is removed, and R2 where a1 is assumed (i.e., transformed into a requirement statement), and a2 is proved.
R passes if and only if, R1 and R2 both pass. In particular, in case R1 (resp. R2) fails, the counter-example shows a violation of a1 (resp. a2).
Caution
We suggest using this mode carefully. In general, as this mode generates and checks more rules, it may lead to worse running-time performance. Please see indications for use below.
When to use it? When you have a rule with multiple assertions:
As a timeout mitigation strategy: checking each assertion separately may, in some cases, perform better than checking all the assertions together and consequently solve timeouts.
If you wish to get multiple counter-examples in a single run of the tool, where each counter-example violates a different assertion in the rule.
Example
To check each assertion separately:
Command line
certoraRun Bank.sol --verify Bank:Bank.spec --multi_assert_check
Configuration file
"multi_assert_check": true
multi_example
Show several counterexamples for failed assert statements and several witnesses for verified satisfy statements.
What does it do?
By default, the Prover returns a single example per rule, either a counterexample (for assert violations) or a witness (for satisfy verification). When this flag is enabled, the Prover will attempt to generate multiple examples from different control-flow paths or logical reasons, offering a broader view of the rule’s behavior.
When to use it? Use this flag when debugging complex rules where multiple, distinct scenarios might lead to failure or success. Seeing several examples can help identify different edge cases and refine in the specification or implementation.
Example
To show several counter examples:
Command line
certoraRun MyContract.sol --verify MyContract:MyContract.spec --multi_example
Configuration file
"multi_example": true
project_sanity
What does it do?
Runs the builtin sanity rule on all methods in the project. If the Prover is run
from within a git project, all .sol files in the in the git repository are added
to the scene and the builtin sanity rule is run on
them. Otherwise, all .sol files in the tree under the current working
directory are collected.
Alternatively, a list of files can be provided in the .conf file and then the
builtin sanity rule will run on all methods of the specified files.
Note
This option implicitly enables the auto_dispatcher option.
When to use it? Mostly used as a first step when starting to work on a new project, in order to “get a feeling” of the complexity of the project for the tool, and what methods may be hot spots for summarization etc.
Example
To run sanity checks on all methods in the project:
Command line
certoraRun --project_sanity
Configuration file
"project_sanity": true
rule_sanity
Option values
none|basic|advanced
What does it do?
This option enables sanity checking for rules.
The rule_sanity option must be followed by one of none, basic, or advanced.
See Rule Sanity Checks for more information about sanity checks.
When to use it? We suggest using this option routinely while developing rules. It is also a useful check if you notice rules passing surprisingly quickly or easily.
Example
To run a rule sanity check:
Command line
certoraRun Bank.sol --verify Bank:Bank.spec --rule_sanity basic
Configuration file
"rule_sanity": "basic"
short_output
What does it do? Reduces the verbosity of the tool.
When to use it? When we do not care much for the output. It is recommended when running the tool in continuous integration.
Example
To reduce output verbosity:
Command line
certoraRun Bank.sol --verify Bank:Bank.spec --short_output
Configuration file
"short_output": true
Options that control the Solidity compiler
Solidity compiler map attributes
When source files are not all compiled with the same solc parameters you should use Solidity compiler map attributes.
Supported map attributes are: compiler_map, solc_optimize_map,
solc_evm_version_map and solc_via_ir_map.
The format of map attributes in the command line is:
certoraRun ... --compiler_map A=solc7.11,C_*=solc8.24,B.sol=solc8.9,src/**/*.vy=vyper0.3.0 ...
The same settings in a conf file:
{
  ...
  "compiler_map": {
    "A": "solc7.11",
    "C_*": "solc8.24",
    "B.sol": "solc8.9",
    "src/**/*.vy": "vyper0.3.0"
  },
  ...
}
The key of each entry is either a contract name pattern or a path pattern.
Path patterns must end with one of the following suffixes: .sol, .vy, or .yul.
It is not allowed to set both the map and the non-map attributes together (e.g., solc and compiler_map).
If a map attribute was set, all files/contracts declared in as sources must be mapped.
For contract patterns, the wildcard character * replaces any character that is allowed in contract names.
For path patterns, the * stands for any character that is allowed in paths that is not a slash (/).
** stands for any number of directories (including none).
When a map attribute is defined and the Prover calls the Solidity compiler, the following will take place:
The entries of the map attributes will be checked for a match by their order of appearance.
If the key is a path pattern, the path of the file will be matched to the path pattern; if there is a match, the value of the entry will be used.
If the entry is a contract pattern, the Prover will check if the file contains a contract that matches the contract pattern.
compiler_map
What does it do? Compiles every file with a different compiler executable (Solidity or Vyper). All used files must be listed. See also Solidity compiler map attributes.
When to use it? When different files have to be compiled with different compiler versions.
Example
To set the compiler of Bank.sol to be solc4.25, for Exchange.sol to be solc6.7, and for Token.vy to be vyper0.3.10:
Command line
certoraRun Bank.sol Exchange.sol Token.vy --verify Bank:Bank.spec --compiler_map Bank.sol=solc4.25,Exchange.sol=solc6.7,Token.vy=vyper0.3.10
Configuration file
"solc_map": {
    "Bank.sol": "solc4.25",
    "Exchange.sol": "solc6.7",
    "Token.vy": "vyper0.3.10"
}
ignore_solidity_warnings
What does it do? This flag turns off the default behavior of treating certain Solidity compiler warnings as errors. When enabled, the tool will allow verification to proceed even if the Solidity compiler emits warnings.
When to use it? Use this flag if your contracts trigger non-critical compiler warnings you want to suppress during verification. This is especially useful for warnings irrelevant to formal verification or when using older code bases with known stylistic issues.
A common example is error 6321: Unnamed return variable can remain unassigned.
The Solidity compiler versions 0.7.6 and up emit this warning, which can be safely ignored in many contexts.
Example
To ignore Solidity compiler warnings:
Command line
certoraRun Token.sol --verify Token:Token.spec --ignore_solidity_warnings
Configuration file
"ignore_solidity_warnings": true
packages
What does it do? For each package, gets the path to a directory including that Solidity package. For more details on packages and remapping see the Packages and Remappings section.
When to use it?
By default we look for the packages in $NODE_PATH. If there are packages are in several different directories, use packages.
Example
To set up package paths:
Command line
certoraRun Bank.sol --verify Bank:Bank.spec --packages ds-note=$PWD/lib/ds-token/lib/ds-stop/lib/ds-note/src contracts=src/contracts
Configuration file
"packages": [
    "ds-stop=$PWD/lib/ds-token/lib/ds-stop/src",
    "contracts=src/contracts"
]
Note
In Solidity projects, information about packages’ location is usually stored in remappings.txt file.
packages_path
What does it do? Gets the path to a directory including the Solidity packages. For more details on packages and remapping see the Packages and Remappings section.
When to use it?
By default, we look for the packages in $NODE_PATH. If the packages are in any other directory, you must use packages_path.
Example
To look for Solidity packages in Solidity/packages:
Command line
certoraRun Bank.sol --verify Bank:Bank.spec --packages_path Solidity/packages
Configuration file
"packages_path": "Solidity/packages"
solc
What does it do? This attribute tells the Prover which Solidity compiler to use. You may pass either:
A full path to the compiler executable, e.g.,
/usr/local/bin/solc8.19, orJust the executable’s name, e.g.,
solc8.19, in which case the tool will search for it in your system’s$PATH.
This behavior mimics the shell’s resolution of commands (similar to how which solc8.19 works).
When to use it? Use this option if your system has multiple Solidity versions installed and you want to select one explicitly. This is particularly useful when working with legacy contracts or caring about specific compiler version behaviors.
Example
To use a Solidity compiler version from $PATH:
Command line
certoraRun Bank.sol --verify Bank:Bank.spec --solc solc8.19
Configuration file
"solc": "solc8.19"
To use a Solidity compiler version via full path:
Command line
certoraRun Bank.sol --verify Bank:Bank.spec --solc /usr/local/bin/solc8.19
Configuration file
"solc": "/usr/local/bin/solc8.19"
solc_allow_path
What does it do?
Passes the value of this option as is to the Solidity compiler’s option --allow-paths.
See Solidity’s allow-paths documentation
When to use it? When we want to add an additional location for the Solidity compiler to load sources from.
Example
To add ~/Projects/Bank as an additional source file location:
Command line
certoraRun Bank.sol --verify Bank:Bank.spec --solc_allow_path ~/Projects/Bank
Configuration file
"solc_allow_path": "~/Projects/Bank"
solc_evm_version
What does it do?
Passes the value of this option to the Solidity compiler’s option --evm-version.
When to use it? When we want to select the Solidity compiler’s EVM version.
Example
To compile for the Istanbul EVM version:
Command line
certoraRun Bank.sol --verify Bank:Bank.spec --solc_evm_version Istanbul
Configuration file
"solc_evm_version": "Istanbul"
solc_evm_version_map
What does it do?
Set EVM version values when different files run with different EVM versions
Passes the value of this option as is to the Solidity compiler’s option --evm-version.
See also Solidity compiler map attributes.
When to use it? When different contracts have to be compiled with different Solidity EVM versions.
Example
To compile Bank for the prague EVM version, and Exchange for the cancun EVM version:
Command line
certoraRun Bank.sol --verify Bank:Bank.spec --solc_evm_version_map Bank=prague,Exchange=cancun
Configuration file
"solc_evm_version_map": {
    "Bank": "prague",
    "Exchange": "cancun"
}
solc_optimize
What does it do?
Passes the value of this option as is to the Solidity compiler’s option --optimize and --optimize-runs.
When to use it? When we want to activate in the Solidity compiler the opcode-based optimizer for the generated bytecode and control the number of times the optimizer will be activated (if no value is set, the compiler’s default is 200 runs).
Example
To set solc optimization for 300 runs:
Command line
certoraRun Bank.sol --verify Bank:Bank.spec --solc_optimize 300
Configuration file
"solc_optimize": "300"
solc_optimize_map
What does it do?
Set optimize values when different files run with different number of runs
Passes the value of this option as is to the Solidity compiler’s option --optimize and --optimize-runs.
See also Solidity compiler map attributes.
When to use it? When we want to activate in the Solidity compiler the opcode-based optimizer for the generated bytecode and control the number of times the optimizer will be activated (if no value is set, the compiler’s default is 200 runs).
Example
To optimize Bank for 200 runs, and Exchange for 300:
Command line
certoraRun Bank.sol --verify Bank:Bank.spec --solc_optimize_map Bank=200,Exchange=300
Configuration file
"solc_optimize_map": {
    "Bank": "200",
    "Exchange": "300"
}
solc_via_ir
What does it do?
Passes the value of this option to the Solidity compiler’s option --via-ir.
When to use it? When we want to enable the IR-based code generator.
Example
To enable the IR-based code generator:
Command line
certoraRun Bank.sol --verify Bank:Bank.spec --solc_via_ir
Configuration file
"solc_via_ir": true
solc_via_ir_map
What does it do?
This flag configures whether the Solidity compiler should enable the IR-based code generator per contract. It allows different contracts in the same project to be compiled with or without the via-ir option.
See also Solidity compiler map attributes.
When to use it? Use this when different contracts require different compilation pipelines. For instance, if one contract benefits from the IR pipeline (e.g., improved output or different optimization behavior) but another fails to compile with the IR pipeline, this flag lets you mix modes safely.
Note
If solc_via_ir is not set globally, no contracts will be compiled via-ir unless explicitly specified in this map.
Example
To compile contract A with the --via-ir flag, and contract B without it:
Command line
certoraRun A.sol B.sol --verify A:A.spec \
  --solc_via_ir_map Bank=true,Exchange=false
Configuration file
"solc_via_ir_map": {
    "Bank": true,
    "Exchange": false
}
vyper
What does it do? This attribute tells the Prover which Vyper compiler to use. You may pass either:
A full path to the compiler executable, e.g.,
/usr/local/bin/vyper0.3.10, orJust the executable’s name, e.g.,
vyper0.3.10, in which case the tool will search for it in your system’s$PATH.
This behavior mimics the shell’s resolution of commands (similar to how which vyper0.3.10 works).
When to use it? Use this option if your system has multiple Vyper versions installed and you want to select one explicitly. This is particularly useful when working with legacy contracts or caring about specific compiler version behaviors.
Example
To use a Vyper compiler version from $PATH:
Command line
certoraRun Bank.sol --verify Bank:Bank.spec --vyper vyper0.3.10
Configuration file
"vyper": "vyper0.3.10"
To use a Vyper compiler version from full path:
Command line
certoraRun Bank.sol --verify Bank:Bank.spec --vyper /usr/local/bin/vyper0.3.10
Configuration file
"vyper": "/usr/local/bin/vyper0.3.10"
Options regarding source code loops
loop_iter
What does it do? Sets the maximal number of loop iterations we verify for. The way the Certora Prover handles loops is by unrolling them - if the loop should be executed three times, it will copy the code inside the loop three times. This option sets the number of unrolls. Be aware that the run time grows exponentially by the number of loop iterations.
When to use it? The default number of loop iterations we unroll is one. However, in many cases, bugs only occur when there are several iterations. Common scenarios include iteration over list elements. Two, or in some cases three, is usually the most iterations you will ever need to uncover bugs.
Example
To set the maximal number of unrolled loop iterations to 2:
Command line
certoraRun Bank.sol --verify Bank:Bank.spec --loop_iter 2
Configuration file
"loop_iter": "2"
optimistic_loop
What does it do?
The Certora Prover unrolls loops - if the loop should be executed three times, it will copy the code inside the loop three times. After we finish the loop’s iterations, we add an assertion to verify we have actually finished running the loop. For example, in a while (a < b) loop, after the loop’s unrolling, we add assert a >= b. We call this assertion the loop unwind condition.
This option changes the assertions of the loop unwind condition to requirements (in the case above require a >= b). That means, we ignore all the cases where the loop unwind condition does not hold, instead of considering them as a failure.
When to use it?
When you have loops in your code and are getting a counterexample labeled loop unwind condition. In general, you need this flag whenever the number of loop iterations varies. It is usually a necessity if using loop_iter.
Caution
optimistic_loop could cause vacuous rules.
Example
To ignore scenarios where the loop unwind condition does not hold:
Command line
certoraRun Bank.sol --verify Bank:Bank.spec --optimistic_loop
Configuration file
"optimistic_loop": true
Options regarding summarization
auto_dispatcher
What does it do?
In case a call’s callee cannot be precomputed but the called method’s sighash
can be (e.g. MyInterface(addr).foo() in Solidity, where addr is some
address typed variable), the default behavior of the Prover in this case is to
havoc. In this case the user can specify a DISPATCHER summaries summary in the
The Methods Block so that the Prover will inline all methods in the scene
that have this sighash.
This option will cause all such unknown callee with known sighash cases to behave
as if an DISPATCHER(optimistic=true) was added for that method in the methods
block.
One important difference from manually placing the DISPATCHER summary in the
The Methods Block is that when it’s manually written there with optimistic=true,
and no such function is found in the scene, the Prover will exit with an error,
but when using the flag it will fall back to the default havoc.
When to use it? When there are many unresolved callee methods, or as a first step to solve call resolution failures.
Example
To automatically use functions with matching signatures when the callee is not resolved:
Command line
certoraRun Bank.sol --verify Bank:Bank.spec --auto_dispatcher
Configuration file
"auto_dispatcher": true
nondet_difficult_funcs
What does it do?
When this option is set, the Prover will auto-summarize
view or pure internal functions that return a value type and are
currently not summarized, and that are found to be heuristically difficult
for the Prover.
For more information, see Detect candidates for summarization.
When to use it? Using this option is recommended when beginning to work on a large code base that includes functions that could be difficult for the Prover. It can help the user get faster feedback, both in the form of faster verification results, as well as highlighting potentially difficult functions.
Example
To auto-summarize difficult suitable internal functions:
Command line
certoraRun Bank.sol --verify Bank:Bank.spec --nondet_difficult_funcs
Configuration file
"nondet_difficult_funcs": true
nondet_minimal_difficulty
What does it do? This option sets the minimal difficulty threshold for the auto-summarization mode enabled by nondet_difficult_funcs.
When to use it? If the results of an initial run with nondet_difficult_funcs were unsatisfactory, one can adjust the default threshold to apply the auto-summarization to potentially more or fewer internal functions.
The notification in the rule report that contains the applied summaries will present the current threshold used by the Prover.
Example
To set the minimal difficulty threshold for the auto-summarization to 20:
Command line
certoraRun Bank.sol --verify Bank:Bank.spec --nondet_difficult_funcs --nondet_minimal_difficulty 20
Configuration file
"nondet_minimal_difficulty": "20"
optimistic_summary_recursion
What does it do?
In case there’s a call to some Solidity function within a summary, we may end up
with recursive calls to this summary. For example, if in the summary of foo we
call the Solidity function bar, and bar’s Solidity code contains a call to
foo, we’ll summarize foo again, which will lead to another call to bar
etc. In this case if this flag is set to false we may get an assertion failure
with a message along the lines of
Recursion limit (...) for calls to ..., reached during compilation of summary ...
Such recursion can also happen with dispatcher summaries —
if a contract method f makes an unresolved external call to a different method
f, and if f is summarized with a DISPATCHER summary, then the Prover will
consider paths where f recursively calls itself. Without optimistic_summary_recursion,
the Prover may report a rule violation with the following assert message:
When summarizing a call with dispatcher, found we already have it in the stack: ... consider removing its dispatcher summary.
The default behavior in this case is to assert that the recursion limit is not
reached (the limit is controlled by the summary_recursion_limit flag).
With optimistic_summary_recursion, the Prover will instead assume that the
limit is never reached.
When to use it?
Use this flag when there is recursion due to summaries calling Solidity
functions, and this causes an undesired assertion failure. In this case one can
either make the limit larger (via summary_recursion_limit) or set this
flag to true.
Example
To ignore scenarios where the summary recursion is over the limit:
Command line
certoraRun Bank.sol --verify Bank:Bank.spec --optimistic_summary_recursion
Configuration file
"optimistic_summary_recursion": true
Caution
This flag could cause unsoundness - even if such recursion could actually happen in the deployed contract, this code-path won’t be verified.
summary_recursion_limit
What does it do? Summaries can cause recursion (see optimistic_summary_recursion). This option sets the summary recursion level, which is the number of recursive calls that the Prover will consider.
If the Prover finds an execution in which a function is called recursively more than the contract recursion limit, the Prover will report an assertion failure (unless optimistic_summary_recursion is set, in which case the execution will be ignored). The default value is zero (i.e. no recursion is allowed).
When to use it?
Use this option when there is recursion due to summaries calling Solidity functions, and this leads to an assertion failure. In this case one can either make the limit larger or set (via optimistic_summary_recursion) flag to
true.Use it if you get the following assertion failure, and disabling optimistic fallback is not possible:
When inlining a fallback function, found it was already on the stack. Consider disabling optimistic fallback mode.
Example
To set the summary recursion limit to 3:
Command line
certoraRun Bank.sol --verify Bank:Bank.spec --summary_recursion_limit 3
Configuration file
"summary_recursion_limit": "3"
Options regarding hashing of unbounded data
optimistic_hashing
What does it do?
When hashing data of potentially unbounded length (including unbounded arrays,
like bytes, uint[], etc.):
If
optimistic_hashingis set the Prover assumes the data’s length is bounded by hashing_length_bound.If
optimistic_hashingis not set, the Prover will check whether the data’s length can exceed thehashing_length_bound, and report an assertion violation if it can.
See Hashing of unbounded data for more details.
When to use it?
When the assertion regarding unbounded hashing is thrown, but it is acceptable for the Prover to ignore cases where a hashed value’s length exceeds the current bound.
Example
To ignore scenarios where a hashed value’s length exceeds the current bound:
Command line
certoraRun Bank.sol --verify Bank:Bank.spec --optimistic_hashing
Configuration file
"optimistic_hashing": true
hashing_length_bound
What does it do?
Limits the maximum length of unbounded data chunks that are being hashed. The bound is defined in bytes and applies differently based on the optimistic_hashing setting:
If optimistic_hashing is enabled, this length is assumed by the Prover.
If disabled, the Prover checks that all relevant data chunks respect this bound.
When to use it?
The default maximum length of unbounded data chunks that are being hashed is 224 (224 bytes correspond to 7 EVM machine words as 7 * 32 == 224).
Reasons to lower the bound:
Can improve SMT solver performance, especially in programs with many instances of unbounded hashing.
Reasons to raise the bound:
When optimistic_hashing is not set: Increase the bound to avoid unnecessary assertion failures when hashed values are bounded, but exceed the default limit.
When optimistic_hashing is set: Raising the value helps detect bugs that depend on a hashed array reaching a certain length. Optimistic hashing excludes all cases where the hashed data exceeds this bound from verification.
Example
To limit the length of hashed data to 128 bytes:
Command line
certoraRun Bank.sol --verify Bank:Bank.spec --hashing_length_bound 128
Configuration file
"hashing_length_bound": "128"
Options that help reduce the running time
compilation_steps_only
What does it do? Stops execution after compiling the source code and specification, without sending a verification request to the Certora cloud.
When to use it? Use this option to check for syntax and compilation errors in your spec without running a full verification. This is useful when you want quick feedback on spec validity without waiting for analysis results.
Example use cases:
You can validate the spec early before writing the rules, while developing hooks, ghost variables, summaries, or CVL functions.
In CI pipelines, you can validate the CVL spec on every pull request, but defer full verification to longer nightly runs.
When working offline, you can continue developing and validating the spec without requiring an internet connection.
Example
To compile source code and specification without starting verification:
Command line
certoraRun Example.sol --verify Example:Example.spec --compilation_steps_only
Configuration file
"compilation_steps_only": true
disable_local_type_checking
What does it do?
This flag disables the local syntax and type checking of your CVL specifications before they are sent to the cloud for verification. When used, simple syntax or type errors will not be caught locally and will only become visible during the cloud run, potentially causing unnecessary delays and confusion.
When to use it?
This flag should only be used in rare cases when you believe the local syntax or type checking has produced an incorrect error, and you are confident that the specification is valid. Before using this flag, it is recommended to first attempt reinstalling the Prover by following the instructions in the Installation section. Using this flag is strongly discouraged as it bypasses an essential layer of error detection, increasing the likelihood of issues being encountered later during the verification process.
Example
To skip local syntax and type checking:
Command line
certoraRun MyContract.sol --verify MyContract:MySpec --disable_local_typechecking
Configuration file
"disable_local_typechecking": true
Caution
Avoid using this flag unless absolutely necessary. It is always better to fix syntax or type issues locally to ensure a smoother verification process.
global_timeout
What does it do?
Sets the maximal timeout for the Prover. Gets an integer input, which represents seconds.
The Certora Prover is bound to run a maximal time of 2 hours (7200 seconds). Users may opt to set this number lower to facilitate faster iteration on specifications. Values larger than two hours (7200 seconds) are ignored.
Jobs that exceed the global timeout will simply be terminated, so the result reports may not be generated.
The global timeout is different from the smt_timeout option:
smt_timeout constrains the amount of time allocated to the processing
of each individual rule, while global_timeout constrains the
processing of the entire job, including static analysis and other
preprocessing.
When to use it? When running on just a few rules, or when willing to make faster iterations on specs without waiting too long for the entire set of rules to complete.
Note
Even if in the shorter running time not all rules were processed, a second run may pull some results from cache, and therefore more results will be available.
Example
To set the global time limit of the Prover to 60 seconds:
Command line
certoraRun Bank.sol --verify Bank:Bank.spec --global_timeout 60
Configuration file
"global_timeout": "60"
method
See method
smt_timeout
What does it do? Sets the maximal timeout for all the SMT solvers. Gets an integer input, which represents seconds.
The Certora Prover generates a logical formula from the specification and source code. Then, it passes it on to an array of SMT solvers. The time it can take for the SMT solvers to solve the equation is highly variable, and could potentially be infinite. This is why they must be limited in run time.
The SMT timeout applies separately to each individual rule (or each method for parametric rules or invariants). To set the global timeout, see global_timeout.
Note
While this is the most prominent timeout, this is not the only timeout that applies to SMT solvers, for details see mediumTimeout and Control flow splitting.
When to use it?
The default time out for the solvers is 300 seconds. There are two use cases for this option.
One is to decrease the timeout. This is useful for simple rules, that are solved quickly by the SMT solvers. Here, it is beneficial to reduce the timeout, so that when a new code breaks the specification, the tool will fail quickly. This is the more common use case.
The second use is when the solvers can prove the property, they just need more time. Usually, if the rule isn’t solved in 600 seconds, it will not be solved in 2,000 either. It is better to concentrate your efforts on simplifying the rule, the source code, add more summaries, or use other time-saving options. The prime causes for an increase of smt_timeout are rules that are solved quickly, but time out when you add a small change, such as a requirement, or changing a strict inequality to a weak inequality.
Example
To set the time limit for SMT solvers to 500 seconds:
Command line
certoraRun Bank.sol --verify Bank:Bank.spec --smt_timeout 500
Configuration file
"smt_timeout": "500"
max_concurrent_rules
What does it do?
This attribute controls the maximum number of rule evaluations that can be executed concurrently. By default, it is set to the number of available CPU cores on the host machine, allowing optimal parallelization under typical conditions. Setting this value to a lower number limits the number of rule evaluation tasks that can run in parallel. By capping the concurrency level, this attribute helps regulate system resource usage, particularly memory consumption, and can prevent resource exhaustion.
When to use it?
Use this attribute when encountering out-of-memory errors, particularly when processing unusually large or complex rule sets. Setting the maximum number of parallel rule evaluations to low values (e.g., 1, 2, or 4) may reduce memory usage in large runs.
Example
To set the limit of concurrent rule evaluations to 4:
Command line
certoraRun Bank.sol --verify Bank:Bank.spec --max_concurrent_rules 4
Configuration file
"max_concurrent_rules": "4"
Options to set addresses and link contracts
address
What does it do? Sets the address of a contract to a given address.
When to use it? When we have an external contract with a constant address. By default, Certora’s client assigns addresses as it sees fit to contracts.
Example
To set the address of the Oracle contract to 12:
Command line
certoraRun Bank.sol Oracle.sol --verify Bank:Bank.spec --address Oracle:12
Configuration file
"address": [
    "Oracle:12"
],
contract_extensions
What does it do? In order to support extendability and upgradeability of smart contracts, the proxy pattern is used. In this patterns there is a base contract (the proxy) which delegate-calls into “extension” contracts (read this explanation for more details). This flag allows specifying that some contract is actually an extension of another one, to help the Prover analyze low-level calls and resolve them correctly in this case. In practice the Prover “moves” all the external function implementations from the extension contract into the base contract, which means that to access them from CVL one should use the base contract as the receiver, and not the extension contract.
When to use it? If you use the proxy pattern in your smart contracts.
Example
Say we have a base contract A that uses an extension contract B.
Since in this pattern the storage of the two contracts may “overlap”, let’s also
assume they both have some uint public n.
In the .conf file one should add
"contract_extensions": {
    "A": [
        {
            "extension": "B",
            "exclude": ["n"]
        }
    ]
}
This tells the Prover that B is an extension contract of A, but that it shouldn’t
“transfer” the getter for n from the extension into the base contract (since the base
contract already has such a function and this would cause a conflict).
For a more detailed example click here.
Note
This option is not supported from the command line and must be used via a configuration file.
contract_extensions_override
What does it do? If this flag is set in addition to the contract_extensions flag, then when the Prover encounters a function that is implemented both in the base and extension contracts, it will override the implementation of the function in the base contract with the one from the extension contract.
When to use it? This flag should be used as an addition to the contract_extensions flag in cases where the proxy pattern is implemented in such a way that the base contract actually has dummy implementations of the functions in the extension contracts (that are used to delegate-call to the corresponding function in the extension contract).
Example
Say we have a base contract A that uses an extension contract B. A
implements a function foo() that delegate-calls the foo() function in
contract B. Without this flag the Prover will fail to “transfer” B.foo()
into A. Setting this flag will cause B’s implementation to override A’s.
command line
certoraRun --contract_extensions_override
configuration file
"contract_extensions_override": true
contract_recursion_limit
What does it do? Contract inlining can cause recursion (see optimistic_contract_recursion). This option sets the contract recursion level, which is the number of recursive calls that the Prover will consider when inlining contracts linked using, e.g., link or struct_link.
Note
In this context, recursion refers to the state where the same external function appears twice in the call stack. Contracts can also exhibit recursive behavior due to recursive calls to internal functions, which is unrelated to this option.
If a counterexample causes a function to be called recursively more than the contract recursion limit, it will report an assertion failure (unless optimistic_contract_recursion is set, in which case the counterexample will be ignored). The default value is zero (i.e., no recursion is allowed).
When to use it?
Use this option when after linking the resulting program may have paths
with recursive calls to external Solidity
functions, and this leads to a recursion-specific assertion failure,
showing the message Contract recursion limit reached.
In this case one can either
make the limit larger or set optimistic_contract_recursion.
Note
Increasing the limit is not always sufficient, as the code may in fact allow theoretically unbounded recursion.
Example
To set the contract recursion limit to 3:
Command line
certoraRun Bank.sol --verify Bank:Bank.spec --contract_recursion_limit 3
Configuration file
"contract_recursion_limit": "3"
link
Option values
<contract>:<slot>=<address>
Note
The recommended approach is to declare linking inline in your spec using a
links block, which provides type checking, precise struct
paths, and support for arrays, mappings, and wildcards. The links block and
--link flag cannot be used together in the same Prover run.
What does it do? Links a slot in a contract with another contract.
When to use it?
Many times a contract includes the address of another contract as one of its fields. If we do not use link, it will be interpreted as any possible address, resulting in many nonsensical counterexamples.
Example
Assume we have the contract Bank.sol with the following code snippet:
IERC20 public underlyingToken;
To set the address of a contract BankToken.sol to be the address underlyingToken:
Command line
certoraRun Bank.sol BankToken.sol --verify Bank:Bank.spec --link Bank:underlyingToken=BankToken
Configuration file
"link": [
    "Bank:underlyingToken=BankToken"
]
optimistic_contract_recursion
What does it do? Contract linking can cause recursion (see also contract_recursion_limit). This option sets the Prover to optimistically assume that recursion cannot go beyond what is defined by contract_recursion_limit, but only if contract_recursion_limit is set to a number higher than 0.
When to use it?
When the recursion due to contract linking is unbounded.
When we are interested only in a limited recursion depth due to contract linking.
Caution
This flag could be another cause for unsoundness - even if such recursion could actually happen in the deployed contract, this code-path won’t be verified beyond the specified recursion limit (contract_recursion_limit).
Example
To ignore scenarios where contract recursion goes over the limit:
certoraRun Bank.sol --verify Bank:Bank.spec --optimistic_contract_recursion true --contract_recursion_limit 1
optimistic_fallback
What does it do?
This option controls how the Prover handles unresolved external calls with an
empty input buffer (length 0).
By default, such calls will havoc all storage of external contracts in
the scene, i.e., of all contracts except for the main verified contract.
When --optimistic_fallback is enabled, the Prover inserts an Optimistic fallback
Dispatcher summary.
This summary dispatches to all implementations of the fallback function that
are available in any contract in the scene.
Furthermore, an additional dispatch option is inserted for the case when the callee
address is chosen by the Prover to be a user address (i.e. an EOA, with extcodesize 0);
then, the given ETH value is transferred to that user address.
Note that the calls made within the Optimistic fallback Dispatcher summary do not
fall under the restrictions of norevert calls. If the chosen fallback
implementation reverts, or if the code size of the unknown contract is non-zero,
the value is transferred back, but the path is not excluded from verification.
Furthermore, note that only non-trivial fallback implementations are used for the
dispatcher, i.e., ones that do not always revert.
In the “ Contracts Call Resolutions” tab, the absence of any explicit
implementation of fallback() is highlighted by a red outline for the
[?].fallback entry.
(The same highlighting is also used for when an AUTO summary
is applied for some call.)
When to use it?
Enable this option to avoid spurious counter examples due to AUTO summaries doing a full state havoc for external calls with empty input buffers.
Example
Consider a contract that contains this snippet:
  ...
  a.call{value: amount}("");
  ...
Assume that the callee, a, is unresolved. (When the callee is resolved,
this option has no effect on that call.) This case will show up as an entry labeled
[?].fallback in the Contract Call Resolutions pane on the left of the report.
If --optimistic_fallback was not set and thus a havoc of all storage.
The entry will be highlighted in red in this case and indicate use of
the “AUTO havoc” summary.
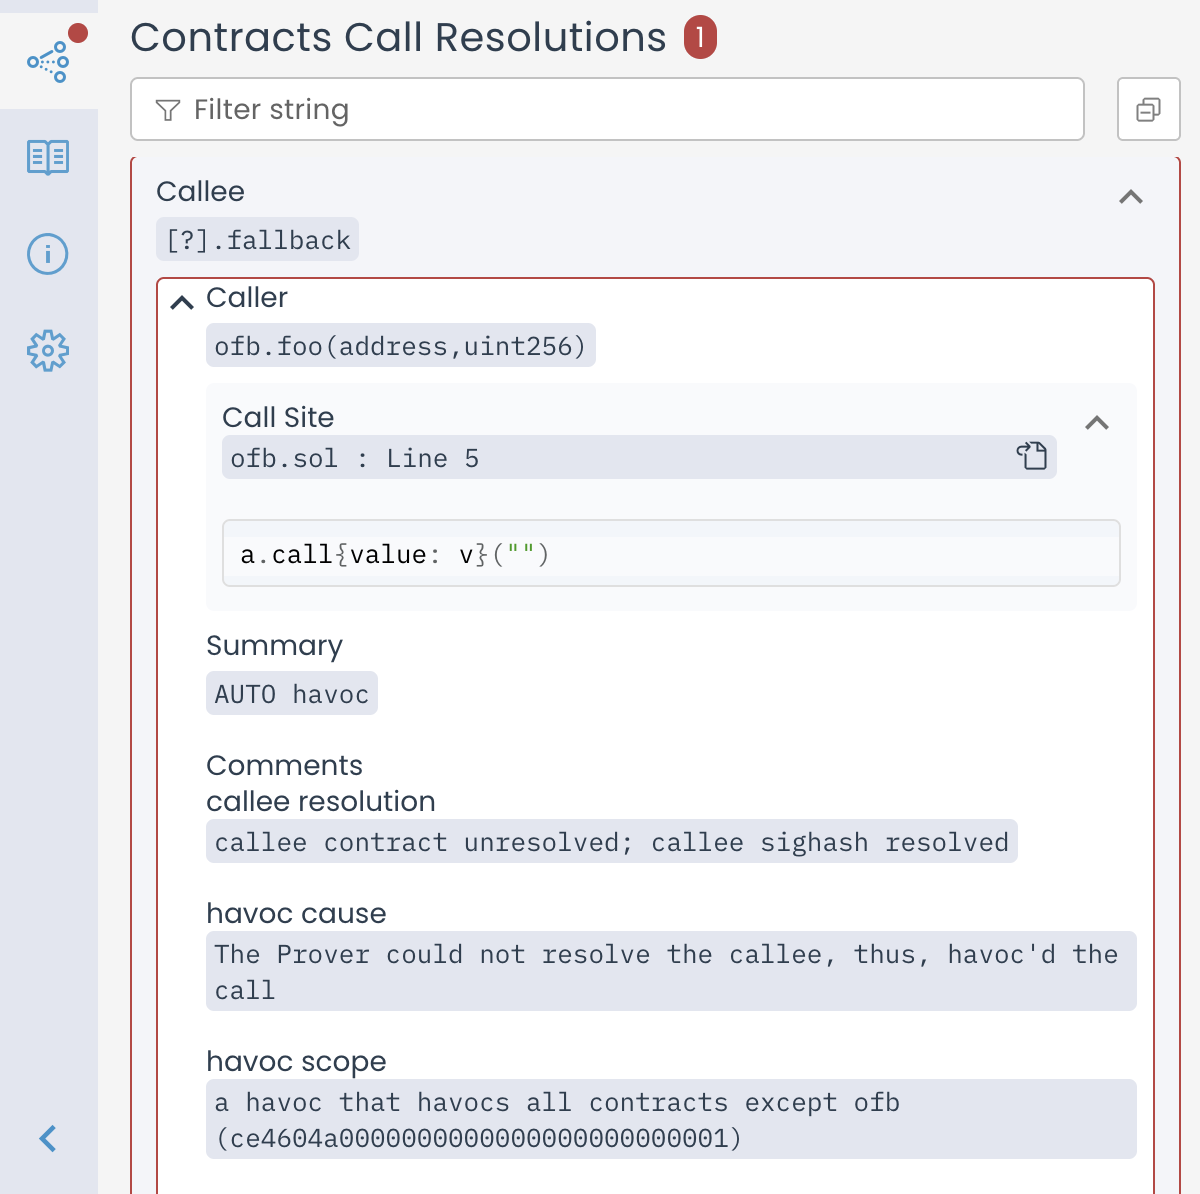
Call Resolutions entry for an unresolved call to the fallback function summarized as AUTO havoc
Now, if we set --optimistic_fallback, the call is still unresolved,
but the contents of the [?].fallback entry in the Call Resolutions
differ. The summary is designated as “Optimistic fallback DISPATCHER”
instead of “AUTO havoc”. Furthermore there is an item called
“alternative explicit fallbacks” listing all the implementations of
fallback that were found in the scene.
If no implementations were found, this is stated, and the box is highlighted
in red, like in the “AUTO havoc” case. This means that if adr has extcodesize 0,
the call transfers amount to adr, otherwise the call has no effect.
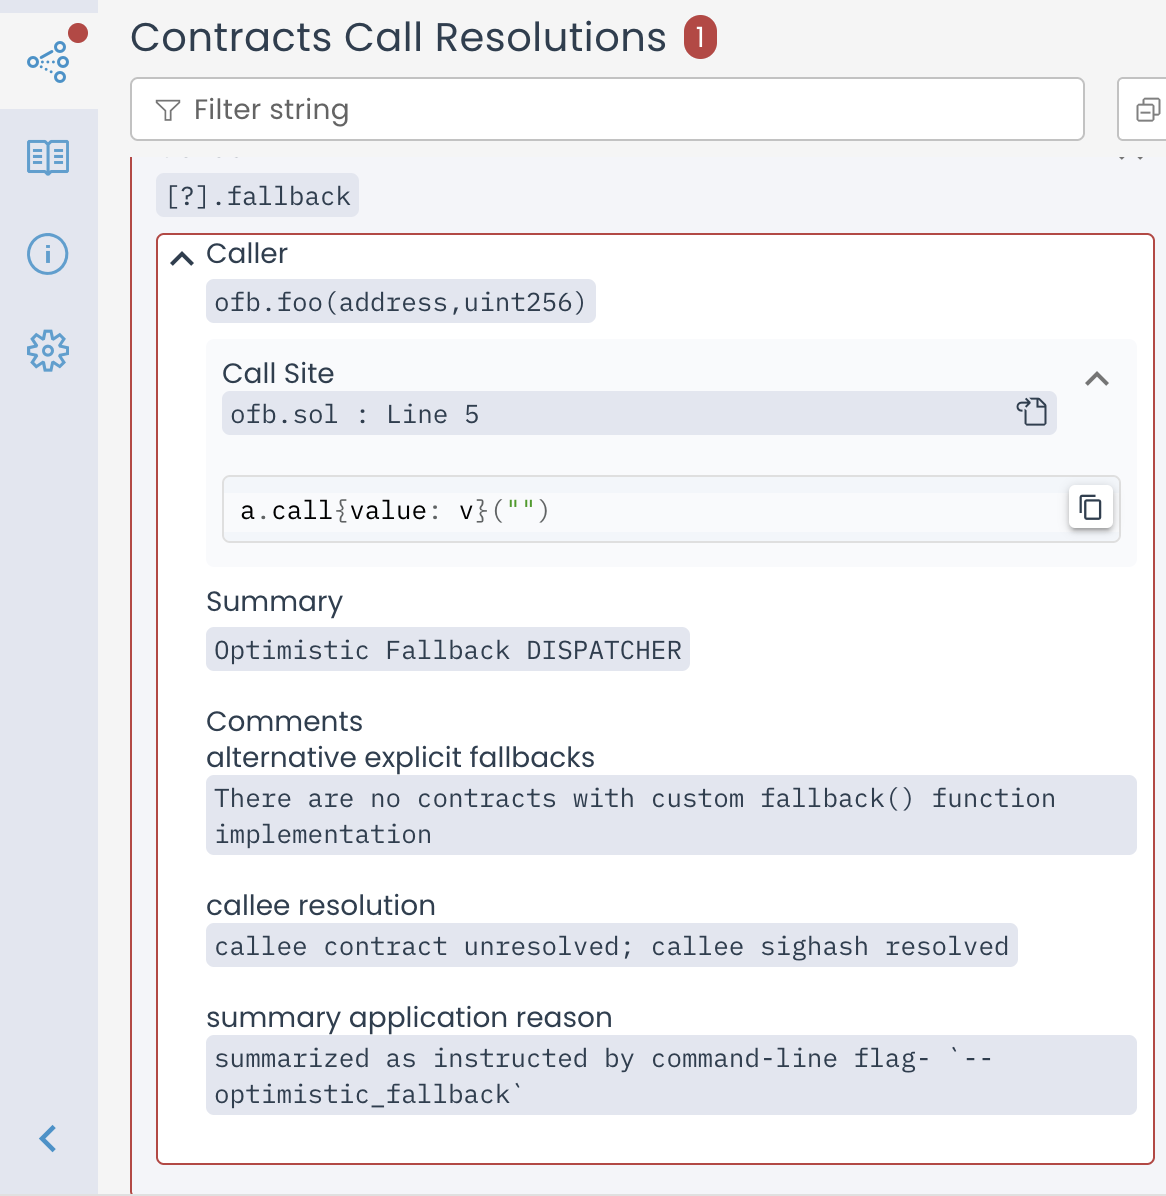
Call Resolutions entry for Optimistic fallback DISPATCHER when there are no fallback implementations
If any fallback implementations were found in the scene, they are listed, and
the box is not highlighted red.
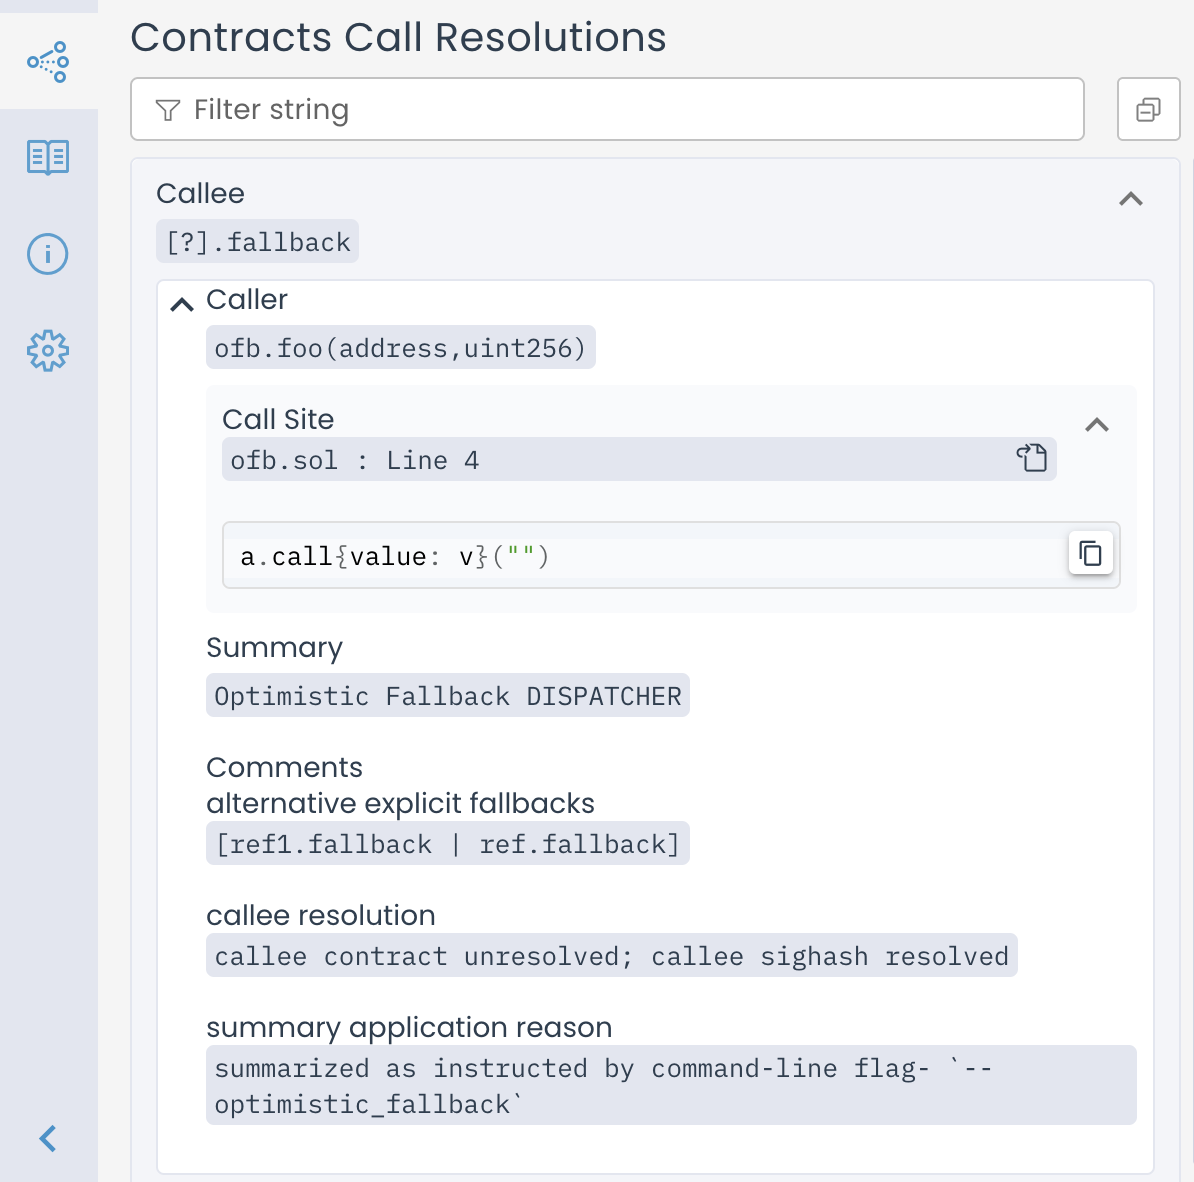
Call Resolutions entry for Optimistic fallback DISPATCHER when there are no fallback implementations
Example invocation:
certoraRun Bank.sol --verify Bank:Bank.spec --optimistic_fallback
Configuration file
"optimistic_fallback": true
struct_link
Option values
<contract>:<field>=<address>
What does it do? Links an address field in all structs to a fixed contract address.
When to use it?
Many times a contract includes the address of another contract inside a field of one of its structs. If we do not use struct_link, such an address will be interpreted as any possible address, resulting in many nonsensical counterexamples. This is applied to all structs, even when they are values within a mapping or array.
Example
Assume we have the contract Bank.sol with the following code snippet:
TokenPair public tokenPair;
Where TokenPair is
struct TokenPair {
    IERC20 tokenA;
    IERC20 tokenB;
}
We have two contracts BankToken.sol and LoanToken.sol.
To set the tokenA field of the tokenPair struct to be BankToken, and tokenB to be LoanToken:
Command line
certoraRun Bank.sol BankToken.sol LoanToken.sol --verify Bank:Bank.spec --struct_link Bank:tokenA=BankToken Bank:tokenB=LoanToken
Configuration file
"struct_link": [
    "Bank:tokenA=BankToken",
    "Bank:tokenB=LoanToken"
]
Caution
The struct_link syntax does not specify the struct’s type name (TokenPair, in the example above) because it is applied to all structs. Note the potential for confusion if multiple structs in the same contract use the same name for address fields that should hold different addresses. E.g. if Bank.sol also defines
struct ReserveTokens {
    IERC20 tokenA;
    IERC20 tokenB;
    IERC20 tokenC;
}
… then the struct_link setting above would result in the same fixed address values for tokenA and tokenB in instances of this struct, which is likely an unintended constraint. Similarly, structs that are values in a mapping or array will all get the same address linkage.
Note
Consider using a links block in your spec instead of
--struct_link. The links block targets specific storage paths and avoids the
ambiguity of matching all structs with the same field name. The links block and
--struct_link flag cannot be used together for the same contract.
Options for job metadata and dashboard filtering
This section includes flags that annotate verification runs with additional metadata. These options don’t affect verification results but make it easier to track jobs, filter them in the dashboard, or manage runs across multiple protocols.
msg
See msg.
protocol_name
What does it do?
Sets the protocol name associated with the verification job. This name will appear in the Prover dashboard and can be used to filter or group related jobs. If this flag is not explicitly provided, the tool will attempt to use the name field from package.json if available.
When to use it? Use this flag to clearly label your jobs. This is especially useful when verifying multiple projects in parallel.
Example
To set the protocol name in the dashboard to be My DeFi Protocol:
Command line
certoraRun Vault.sol --verify Vault:Vault.spec --protocol_name "My DeFi Protocol"
Configuration file
"protocol_name": "My DeFi Protocol"
Options for controlling contract creation
dynamic_bound
What does it do? This option takes a non-negative integer as input.
If set to 0 (the default), contract creation operations, such as using
new,create, orcreate2, are treated as unresolved external calls, resulting in havoc.If set to a positive value
n, the Prover will model contract creation using cloning, allowing each contract to be instantiated up tontimes.
When to use it?
Enable this option when you want to simulate actual contract creation, including the contract’s constructor, storage, code, and immutables.
Without it, the Prover treats create and create2 as returning arbitrary fresh addresses, with no modeling of the created contract’s internal state.
As a result, any interaction with those addresses will be imprecise and treated conservatively as havoc.
Example
To allow each contract to be created dynamically up to once per transaction:
Command line
certoraRun C.sol Foo.sol --verify C:C.spec --dynamic_bound 1
Configuration file
"dynamic_bound": "1"
dynamic_dispatch
What does it do?
By default, contract method invocations on newly created instances remain unresolved, requiring explicit DISPATCHER summaries for all such method calls.
With this option, the Prover will automatically apply the DISPATCHER summary on a best-effort basis for call sites where the receiver is proven to be a newly created contract.
Limitations
This option only applies when the Prover can prove that the callee is a created contract.
If a contract instance is assigned from both a newly created contract and another source (e.g., storage), calls will remain unresolved. For example:
MyFoo f;
if(*) {
   f = new MyFoo(...);
} else {
  f = storageStruct.myFoo;
}
f.bar();
When to use it?
Use this flag when you prefer not to manually add explicit DISPATCHER summaries for methods invoked by the created contract.
Example
Suppose a contract C creates a new instance of a contract Foo.
Foo calls some method m().
To inline the constructor of Foo at the creation site, and automatically link the method m() to Foo:
Command line
certoraRun C.sol Foo.sol --verify C:C.spec --dynamic_bound 1 --dynamic_dispatch
Configuration file
"dynamic_bound": "1",
"dynamic_dispatch": true
Note
You must also use the dynamic_bound option.
prototype
Option values
<hex string>=<contract>
What does it do?
Instructs the Prover to use a specific contract type for the return value from a call to create or create2 on the given hexadecimal string as a prefix. The hexadecimal string represents proxy code that forwards calls to another contract. As we are using the prototype flag to skip calls to the proxy, no constructor code is being simulated for these contract creation resolutions.
When to use it?
If you are verifying a contract creation that uses low level calls to create or create2 for contract creation.
Example
Suppose you have a contract C that creates another contract Foo like this:
assembly {
     let ptr := mload(0x40)
     mstore(ptr, 0x3d602d80600a3d3981f3363d3d373d3d3d363d73000000000000000000000000)
     mstore(add(ptr, 0x14), shl(0x60, implementation))
     mstore(add(ptr, 0x28), 0x5af43d82803e903d91602b57fd5bf30000000000000000000000000000000000)
     instance := create(0, ptr, 0x37)
}
Then you can set the string 3d602d80600a3d3981f3363d3d373d3d3d363d73 appearing in the first mstore after the 0x prefix as a “prototype” for Foo.
The Prover will then be able to create a new instance of Foo at the point where the code creates it.
Command line
certoraRun C.sol Foo.sol --verify C:C.spec --prototype 3d602d80600a3d3981f3363d3d373d3d3d363d73=Foo --dynamic_bound 1
Configuration file
"dynamic_bound": "1",
"prototype": "3d602d80600a3d3981f3363d3d373d3d3d363d73=Foo"
Note
This argument has no effect if the dynamic bound is zero.
Note
The hex string must be:
A strict prefix of the memory region passed to the create command.
Must be unique within each invocation of the tool.
Must not contain gaps, e.g.,
3d602d80600a3d3981f3363d3d373d3d3d363d730000in the above example will not work (those last four bytes will be overwritten) but3d602d80600a3d3981f3363d3d373d3d3d363dwill.
Version options
version
What does it do?
Shows the version of the local installation of certora-cli you have.
When to use it? When you suspect you have an old installation. To install the newest version, use
pip install --upgrade certora-cli
Example
To show the Prover’s version:
certoraRun --version
prover_version
Option values
<Prover version name>
What does it do? This option lets you select a specific version of the Certora Prover.
When to use it? Use this flag to reproduce behavior from an earlier version of the Prover, which is especially useful when features have been changed or deprecated in newer releases.
Example
To run verification using the Prover version from the April 10, 2025 release:
Command line
certoraRun MyContract.sol --verify MyContract:MySpec.spec --prover_version release/10April2025
Configuration file
"prover_version": "release/10April2025=Foo"
Conf file options
override_base_config
What does it do?
Allows you to import options from another .conf file.
This option gets as a value a path to the imported .conf file.
If the path is relative, it is relative to the current working directory,
regardless of the original .conf file’s location.
Options in the imported .conf file will be overridden if the same option appears also in the original .conf file or in the command line.
It is only possible to import from a single .conf file and
the imported .conf file cannot import from yet another .conf file.
When to use it?
When you want to use the same options for multiple runs, but with some small changes.
For example, you can have a base config file with all the options you need,
and then create a new .conf file that imports the base one
and overrides only the options you want to change.
Using a base configuration file saves you from repeatedly writing the same option in the command line or other configuration files.
Example
To import options from the configuration file at confs/base_settings.conf:
Command line
certoraRun proj.conf --override_base_config confs/base_settings.conf
Configuration file
"override_base_config": "confs/base_settings.conf"
url_visibility
Option values
private|public
What does it do? This attribute controls the visibility of the report link generated by the CLI. To minimize the risk of unintentionally sharing a public URL, the CLI excludes anonymous access keys from the report link by default and returns only the private version.
Enum values:
private(default): Returns a report link without an anonymous access key.public: Returns a report link that includes an anonymous access key for public access.
Note
In CI, the default behavior differs. The CLI will always output the public link to facilitate easy sharing among users.
When to use it?
Use public when you are running the CLI locally and need to share the report externally.
Use private when running jobs in CI environments to restrict access to the report.
Example
To output a public report link that includes an anonymous access key:
Command line
certoraRun proj.conf --url_visibility
Configuration file
"url_visibility": "public"
Advanced options
java_args
What does it do?
Allows configuring the underlying JVM.
When to use it?
Upon instruction from the Certora team.
Example
To set the number of “tasks” that can run in parallel to 2:
Command line
certoraRun proj.conf --java_args '"-Dcvt.default.parallelism=2"'
Configuration file
"java_args": [
    "-Dcvt.default.parallelism=2"
]
assume_no_casting_overflow
This option adds an implicit assumption to all Solidity casting operation. For example, if int16(x) appears in the Solidity code, then it is assumed that x is indeed in the valid range of int16 at this point in the program.
Note that this flag may result in an underapproximation, i.e., it may result in the tool not checking some valid runs. That is because Solidity does not revert on out-of-bounds casting operations. Therefore, it is important to use this option with caution.
Example
To assume Solidity casts do not overflow / underflow:
Command line
certoraRun proj.conf --assume_no_casting_overflow true
Configuration file
"assume_no_casting_overflow": true
precise_bitwise_ops
What does it do? This option models bitwise operations exactly, instead of using the default overapproximation. It is useful when the Prover reports a counterexample caused by incorrect modeling of bitwise operations, but enabling this option can significantly increase verification time.
Limitations
This encoding does not model
mathintprecisely.The maximum supported integer value is \(2^{256} - 1\), effectively restricting
mathintto auint256.There is currently no encoding that precisely models both bitwise operations and
mathintsimultaneously.
When to use it? Use this option if a counterexample suggests that incorrect modeling of bitwise operations is affecting verification results.
Example
To model bitwise operations exactly:
Command line
certoraRun Bank.sol --verify Bank:Bank.spec --precise_bitwise_ops
Configuration file
"precise_bitwise_ops": true
prover_args
The prover_args option allows you to provide fine-grained tuning options to the
Prover.
prover_args receives a string containing Prover-specific options, and will be sent as-is to the Prover.
prover_args cannot set Prover options that are set by standalone certoraRun options (e.g. the Prover option -t is
set by smt_timeout therefore cannot appear in prover_args). prover_args value must be quoted.
enableStorageSplitting
This option disables the storage splitting optimization.
Usage
To disable storage splitting optimization:
Command line
certoraRun Bank.sol --verify Bank:Bank.spec --prover_args '-enableStorageSplitting false'
Configuration file
"prover_args": [
  "-enableStorageSplitting false"
]
maxNumberOfReachChecksBasedOnDomination
This option sets the number of program points to test with the deepSanity
built-in rule. See Thorough complexity checks — deepSanity.
Usage
To set the number of program points to test with deepSanity to 2:
Command line
certoraRun Bank.sol --verify Bank:Bank.spec --prover_args '-maxNumberOfReachChecksBasedOnDomination 2'
Configuration file
"prover_args": [
  "-maxNumberOfReachChecksBasedOnDomination 2"
]
optimisticReturnsize
This option determines whether havoc summaries assume
that the called method returns the correct number of return values.
It will set the value returned by the RETURNSIZE EVM instruction according to the
called method.
Note
Certain conditions should hold in order for the option to take effect.
Namely, if there is a single candidate method in the havoc site,
and all instances of this method in the scene have exactly the same
expected number of return values, then the RETURNSIZE value will be set to
the expected size matching the methods in the scene.
Otherwise, RETURNSIZE will remain non-deterministic.
Usage
To ignore scenarios where an incorrect number of values is returned by summarized methods:
Command line
certoraRun Bank.sol --verify Bank:Bank.spec --prover_args '-optimisticReturnsize true'
Configuration file
"prover_args": [
  "-optimisticReturnsize true"
]
smt_groundQuantifiers
This option disables quantifier grounding. See Quantifier Grounding for more information.
Usage
To disable quantifier grounding:
Command line
certoraRun Bank.sol --verify Bank:Bank.spec --prover_args '-smt_groundQuantifiers false'
Configuration file
"prover_args": [
  "-smt_groundQuantifiers false"
]
superOptimisticReturnsize
This option determines whether havoc summaries assume
that the called method returns the correct number of return values.
It will set the value returned by the RETURNSIZE EVM instruction
to the size of the output buffer as specified by the summarized CALL instruction.
Usage
To ignore all scenarios where an incorrect number of values is returned by summarized methods:
Command line
certoraRun Bank.sol --verify Bank:Bank.spec --prover_args '-superOptimisticReturnsize true'
Configuration file
"prover_args": [
  "-superOptimisticReturnsize true"
]
useUnresolvedHarness
When enabled, the Prover redirects unresolved external calls to a
user-provided Solidity contract named CertoraUnresolvedHarness
instead of applying a havoc summary.
See Unresolved Call Harness for full details.
Usage
To enable the unresolved call harness:
Command line
certoraRun Bank.sol CertoraUnresolvedHarness.sol \
    --verify Bank:Bank.spec \
    --prover_args '-useUnresolvedHarness true'
Configuration file
"prover_args": [
  "-useUnresolvedHarness true"
]
Control flow splitting options
See here for an explanation of what is control flow splitting.
depth
What does it do?
Sets the maximum splitting depth.
When to use it?
When the deepest splits are too heavy to solve, but not too high in number, increasing this will lead to smaller, but more numerous split leaves, which run at the full SMT timeout (as set by smt_timeout). Conversely, if run time is too high because there are too many splits, decreasing this number means that more time is spent on fewer, but bigger split leaves. The default value for this option is 10.
Example
To set the splitting depth limit to 5:
Command line
certoraRun Bank.sol --verify Bank:bank.spec --prover_args '-depth 5'
Configuration file
"prover_args": [
  "-depth 5"
]
dontStopAtFirstSplitTimeout
What does it do?
We can tell the Certora Prover to continue even when the a split has had
a maximum-depth timeout. Note that this is only useful when there exists a
counterexample for the rule under verification, since in order to prove
the absence of counterexamples (i.e. correctness), all splits need to be
counterexample-free. (In case of a rule using satisfy rather than assert,
the corresponding statements hold for witness examples. In that case,
this option is only useful if the rule is correct.)
When to use it?
When looking for a SAT result and observing an SMT-type timeout.
The default value for this option is false.
Example
To continue verification after reaching a maximum-depth timeout:
Command line
certoraRun Bank.sol --verify Bank:bank.spec --prover_args '-dontStopAtFirstSplitTimeout true'
Configuration file
"prover_args": [
  "-dontStopAtFirstSplitTimeout true"
]
mediumTimeout
The “medium timeout” determines how much time the SMT solver gets in seconds for checking a split that is not a split leaf. (For split leaves, the full smt_timeout is used.)
What does it do?
Sets the time that non-leaf splits get before being split again.
When to use it?
When a little more time can close some splitting subtrees early, this can save a lot of time, since the subtree’s size is exponential in the remaining depth. On the other hand, if something will be split further anyway, this can save the run time spent on intermediate “TIMEOUT” results. Use smt_initialSplitDepth to eliminate that time investment altogether up to a given depth.
Example
To set the medium timeout to 20 seconds:
Command line
certoraRun Bank.sol --verify Bank:Bank.spec --prover_args '-mediumTimeout 20'
Configuration file
"prover_args": [
  "-mediumTimeout 20"
]
smt_initialSplitDepth
With this option, the splitting can be configured to skip the SMT solver-based checks at low splitting levels, thus generating sub-splits up to a given depth immediately.
What does it do?
The first <number> split levels are not checked with the SMT solver, but rather
split immediately.
When to use it?
When there is a lot of overhead induced by processing and trying to solve splits that are very hard, and thus run into a timeout anyway.
Note
The number of splits generated here is equal to \(2^n\) where n is the initial
splitting depth (assuming the program has enough branching points,
which is usually the case);
thus, low numbers are advisable. For instance setting this to 5 means that the
Prover will immediately produce 32 splits.
Note
The depth setting has precedence over this setting. I.e., if -depth
is set to a lower value than -smt_initialSplitDepth, the initial splitting
will only proceed up to the splitting depth given via -depth.
Example
To start checking only splits with a depth of 4 or greater:
Command line
certoraRun Bank.sol --verify Bank:bank.spec --prover_args '-smt_initialSplitDepth 3'
Configuration file
"prover_args": [
  "-smt_initialSplitDepth 3"
]